Getting Started with StickySync
Getting Started
-
Generate an ITGlue API key from instruction in this KB Article:
- Users with an Administrator role can navigate to Account > Settings.
- Click on API Keys > Custom API Keys.
- Enter a name for the key and click Generate API Key. You will not be able to view a key again after it has been generated.
- For security, an optional Password Access setting is provided for each API key. Password values can be accessed from the Passwords API only if this setting is enabled.
- To generate multiple API keys, click the plus sign icon.

-
Install the StickySync.dll in the Plugin Manager of Automate.
-
Restart the Database agent.
-
Restart your Control Center.
-
Once your Control Center is back up, head over to Tools > StickySync.
-
Enter your API key and click "Apply".

-
Once your API key is confirmed, you're ready to start mapping clients. Head over to the Org Mapping section and start mapping your Automate clients to your ITGlue organizations.

-
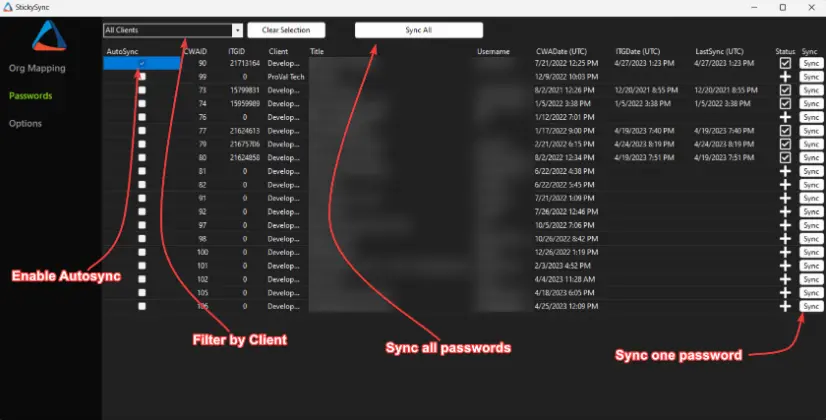
Once that is complete, head over to the Passwords section.
- You can Sync individual passwords from Automate to ITGlue here, or sync them en-masse with the "Sync All" button. Selecting the "AutoSync" checkbox for a password will ensure that the password in ITGlue is always the same as the password in Automate.
- The "Sync All" button is contextual. If you are filtering the passwords list by a specific client, then the button will only "Sync All" passwords for that client.
- You can Sync individual passwords from Automate to ITGlue here, or sync them en-masse with the "Sync All" button. Selecting the "AutoSync" checkbox for a password will ensure that the password in ITGlue is always the same as the password in Automate.
Tables
plugin_stickysync_companymap
| Column | Type | Example |
|---|---|---|
| ClientID | INT | 123 |
| ITGOrgID | INT | 456 |
plugin_stickysync_passwordautosync
| Column | Type | Example |
|---|---|---|
| PasswordID | INT | 1234 |
| AutoSync | TINYINT | 1 |
plugin_stickysync_passwordmap
| Column | Type | Example |
|---|---|---|
| PasswordID | INT | 1234 |
| ITGPasswordID | INT | 5678 |
| LastSync | DATETIME | 2023-04-24 16:19:23 |
plugin_stickysync_settings
| Column | Type | Example |
|---|---|---|
| APIKey | VARCHAR | w1PqyjacT3jUBjQPQDdB4A== |
Changelog
2025-04-09
- Initial version of the document