RMM+ Plugin Configuration
Purpose
This document assists with configuring the RMM+ Plugin and explains how to create sessions for machines that have not checked in for over X number of days.
Implementation
-
Log in to the client's control portal and check if the extension for RMM+ has been updated.
-
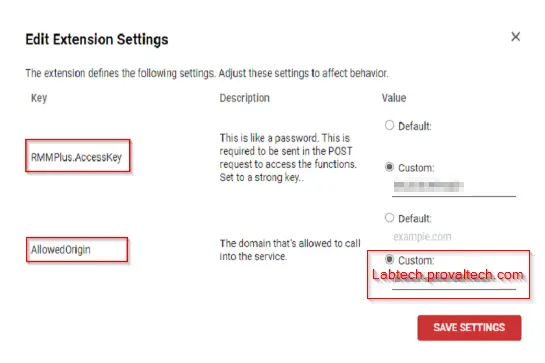
Go to
Edit Settingsfor the RMM+ plugin.

-
Navigate to RMMPlus.AccessKey and select the
Customoption. Create a random password as the custom value. -
Go to AllowedOrigin and select the
Customoption. Enter the FQDN of the client's Automate environment.
The FQDN should not containhttps://
For example, labtech.provaltech.com
-
Save the settings.
-
Open the Automate control center of the client. Navigate to System Dashboard > Config > Configuration > Properties.
-
Add the following values in Properties:
Parameter Value RMMPlus_AccessKey Enter the value you entered in Step 3 RMMPlus_Headers Origin: FQDN as entered in Step 4
(For example - Origin:labtech.provaltech.com)RMMPlus_StaleAgentThreshold 30 RMMPlus_Timeout 1000 
-
Add the Get Post Plugin in the client's environment. Follow the steps below:
- Open Plugin Manager. Navigate to Advanced > Manage Plugins > Add Plugin.

- Select the .dll file for the Get Post Plugin. See attachment.
- Check the box for a remote agent.
- Enable the plugin. This will restart the DB agent.
- Reload DB agent plugins.
- Open Plugin Manager. Navigate to Advanced > Manage Plugins > Add Plugin.
-
Reload the System Cache.

-
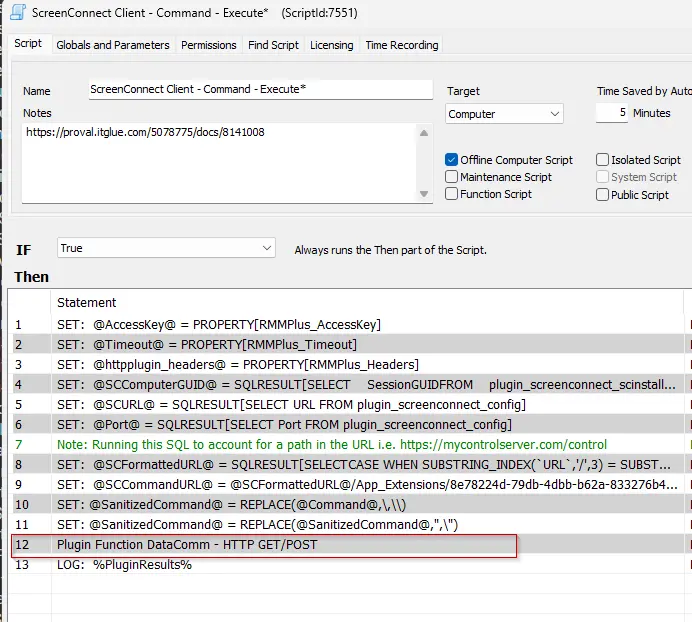
Open the
ScreenConnect Client - Command - Executescript and check if you can see thePlugin Function DataComm - HTTP GET/POSTstep.
Optional
Create a session group in the ScreenConnect portal for machines that have not checked into Control for over X days.
- Go to the ScreenConnect Web Portal.
- Navigate to the
Accessportal.

- Click on the
+ Create Session Groupoption available at the bottom of the screen.

- Enter the name for the session and add the filter as below. You can customize it as per your requirements by clicking on the
+icon in front of theSession Filteroption. You can also select theShow Referenceoption for more clarity.Change the number of days inGuestConnectedCount = 0 AND LastEventTime < $30DAYSAGO$30DAYSAGOas per your requirement.
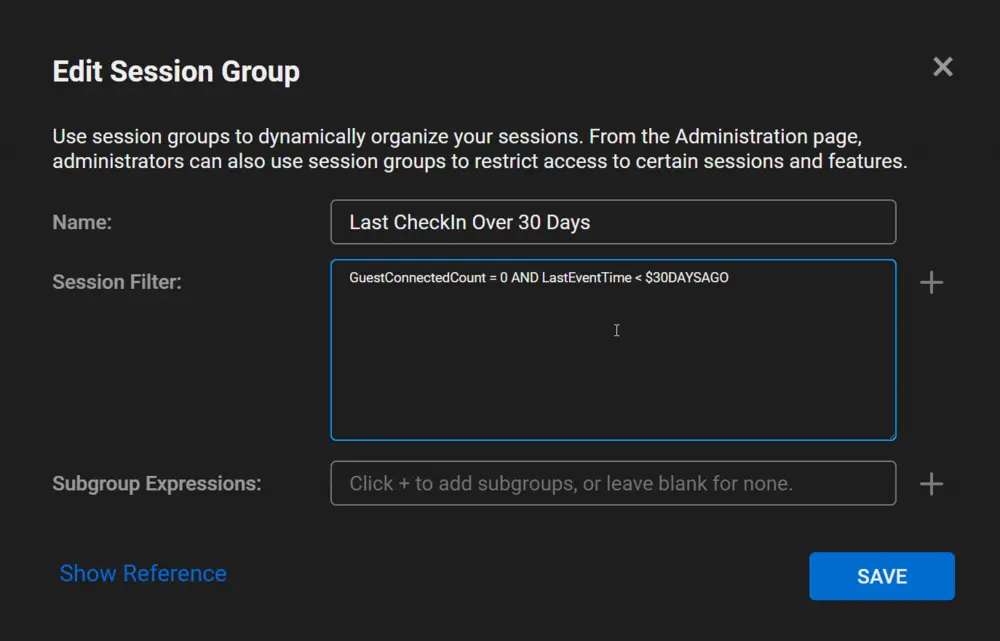
- Click on Create. Now you can see the agents that have not checked in for over
Xdays.
Attachments
Changelog
2025-04-10
- Initial version of the document