Cisco Secure Client Package Installation (Windows)
Summary
This task is a CW RMM implementation of the agnostic script Install-CiscoSecureClient. It allows for the installation of either the entire suite or specific modules of the Cisco Secure Client. Parameters are utilized in a manner consistent with the agnostic script approach.
Prerequisites
Download the Cisco Secure Client Pre-Deployment Package (Windows) - includes individual MSI files and place it in a downloadable location as Cisco_Secure_Client.zip.
NOTE
To access/download these files, you will need a login to the Cisco portal. If you do not have a portal login, please create one and validate your access before attempting to download the files, or you will receive an error like this:

The file can be downloaded from Cisco Software Download. Cisco changes this download URL for each release. Prefer downloading the latest stable version of the tool.
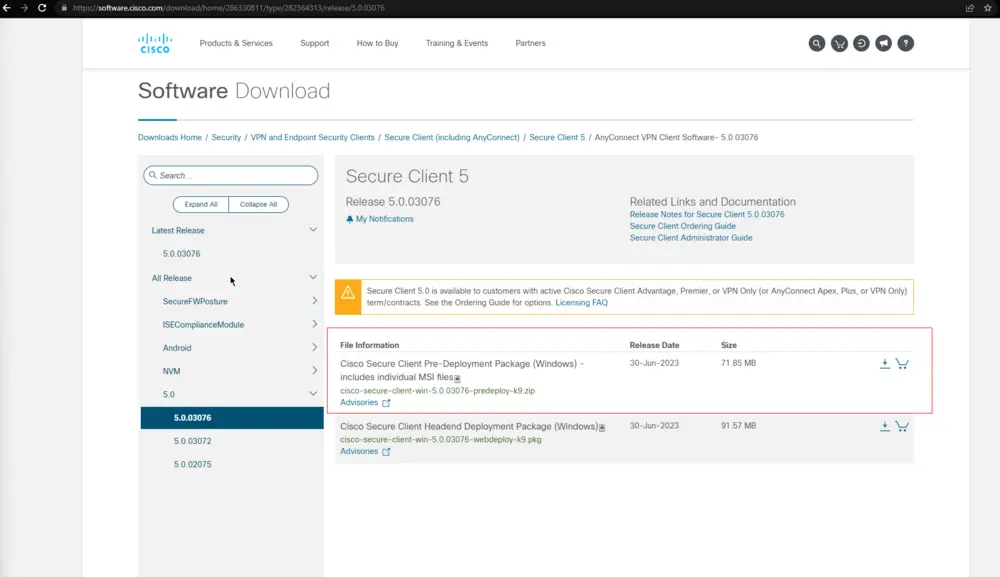
Example of a Download URL: https://file.provaltech.com/apps/packages/cisco_secure_client.zip
Dependencies
Sample Run
Variables
| Name | Description |
|---|---|
| Parameter | Parameter stored in the Cisco Secure Client Parameter custom field for the company. |
| Output | Stores the output of the previously executed PowerShell script, and its value changes after each execution of a PowerShell script. |
Script Creation
Create the company-level Custom Field Cisco Secure Client Parameter.
Create a new Script Editor style script in the system to implement this task.

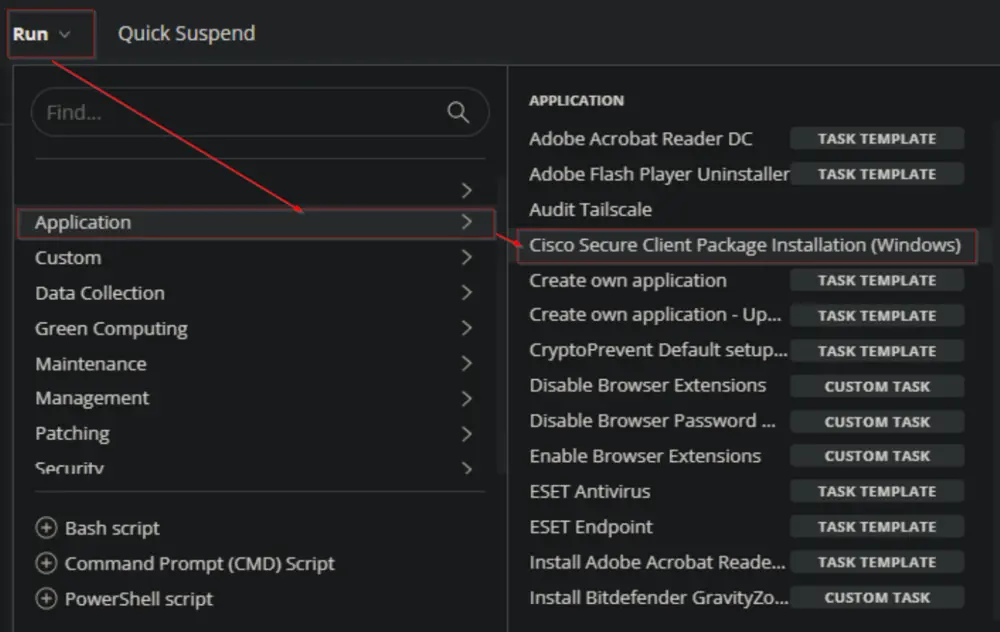
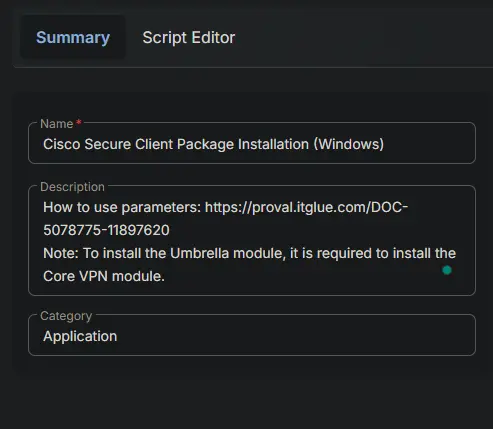
Name: Cisco Secure Client Package Installation (Windows)
Description: How to use parameters: [Install-CiscoSecureClient](/docs/fc6bcac9-770a-46dc-902c-7176cb1d73ea) Note: To install the Umbrella module, it is required to install the Core VPN module.
Category: Application
Script
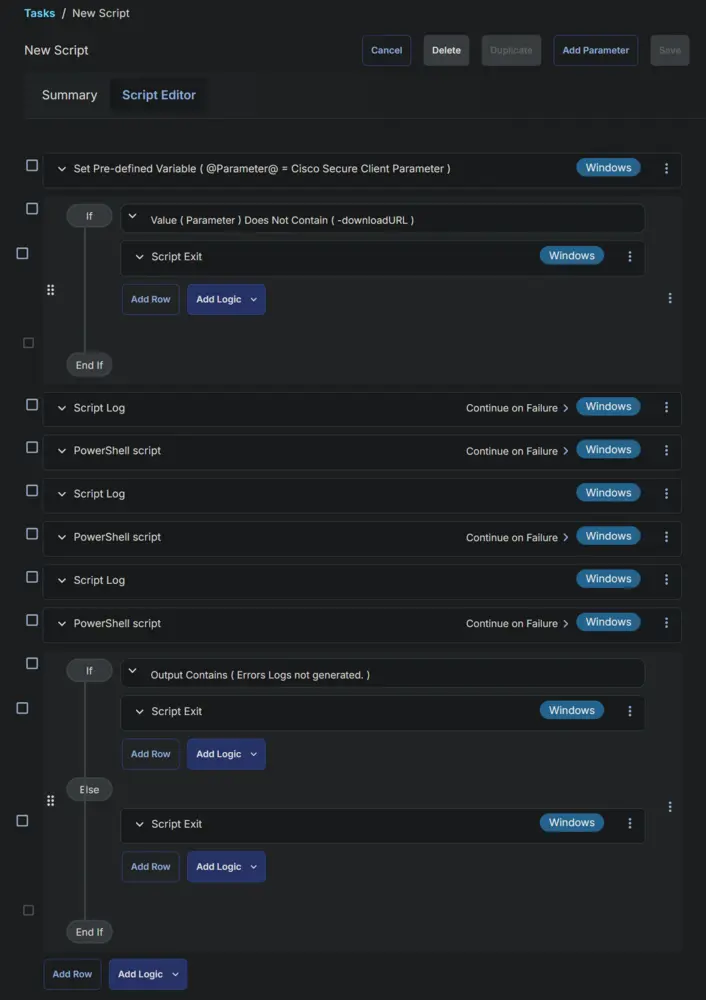
Start by adding a row. You can do this by clicking the Add Row button at the bottom of the script page.

Row 1 Function: Set Pre-defined Variable
Select Set Pre-defined Variable function.


Select the Custom Field option.

Type Parameter in the Variable Name field and search and select the Cisco Secure Client Parameter in the Search Custom Field field.

Click the Save button to save the function.


Row 2 Logic: If/Then
Insert a new row by selecting the If/Then option from the Add Logic dropdown button.


Row 2a Condition: Value Does Not Contain
Select the Value option from the drop-down button next to the Output option.


Enter Parameter in the Enter Value field and press the Enter button on your keyboard.

Select Does Not Contain comparator from the drop-down button next to the Contains option.


Type -downloadURL in the Input Value and Variable field and press the Enter button on your keyboard.

Row 2b Function: Script Exit
Insert a new row by clicking the Add Row button inside the If/Then logic after the Output Contains condition.

Select Script Exit function.


Paste this line in the Error Message box and click the Save button.
Parameter is not set at the company level Custom field Cisco Secure Client Parameter. Exiting script with error.


Row 3 Function: Script Log
Insert a new row by clicking the Add Row button.

Select Script Log function.


Paste this line in the Script Log Message box and click the Save button.
Parameters Used:
@Parameter@


Row 4 Function: PowerShell Script
Insert a new row by clicking the Add Row button.
Select PowerShell Script function.


Paste in the following PowerShell script, set the expected time of script execution to 900 seconds, and click the Save button.
#region Setup - Variables
$ProjectName = 'Install-CiscoSecureClient'

$BaseURL = 'https://file.provaltech.com/repo'
$PS1URL = "$BaseURL/script/$ProjectName.ps1"
$WorkingDirectory = "C:\ProgramData\_automation\script\$ProjectName"
$PS1Path = "$WorkingDirectory\$ProjectName.ps1"
#endregion

#region Setup - Folder Structure
mkdir -Path $WorkingDirectory -ErrorAction SilentlyContinue | Out-Null
try {
    Invoke-WebRequest -Uri $PS1URL -OutFile $PS1path -UseBasicParsing -ErrorAction Stop
} catch {
    if (!(Test-Path -Path $PS1Path )) {
        throw ('Failed to download the script from ''{0}'', and no local copy of the script exists on the machine. Reason: {1}' -f $PS1URL, $($Error[0].Exception.Message))
    }
}
#endregion
$workingpath = $WorkingDirectory
#region Execution
    & $PS1Path @Parameter@
#endregion
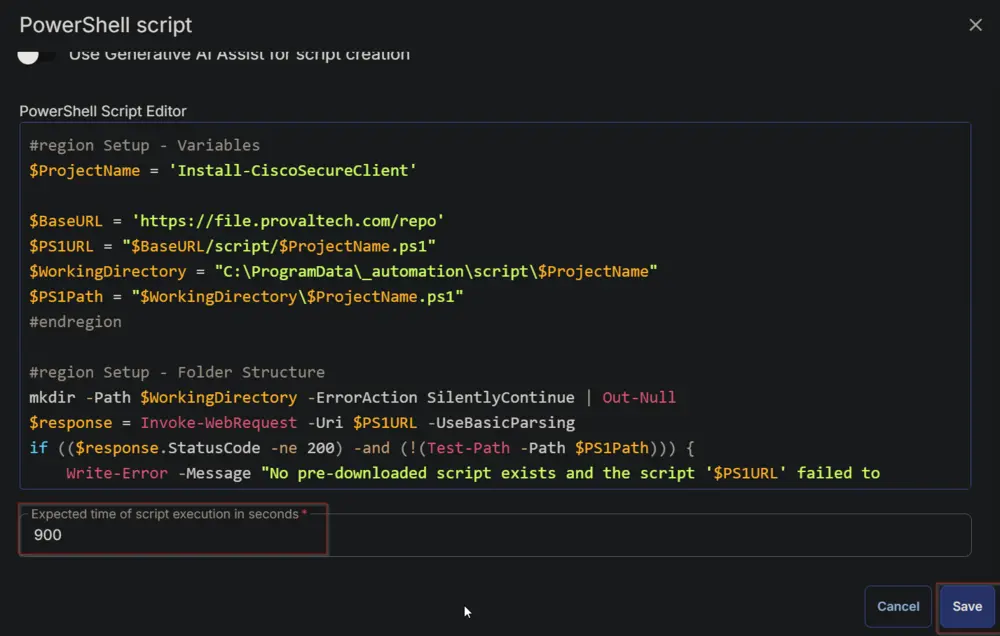
Mark the Continue on Failure checkbox.

Row 5 Function: Script Log
Insert a new row by clicking the Add Row button.
Select Script Log function.
Paste this line in the Script Log Message box and click the Save button.
PowerShell Output:
%Output%

Row 6 Function: PowerShell Script
Insert a new row by clicking the Add Row button.
Select PowerShell Script function.
Paste in the following PowerShell script, set the expected time of script execution to 300 seconds, and click the Save button.
$logPath = 'C:\ProgramData\_automation\script\Install-CiscoSecureClient\Install-CiscoSecureClient-log.txt'
if ( Test-Path $logPath ) {
    Get-Content -Path $logPath
} else {
    return 'Log file not generated'
}
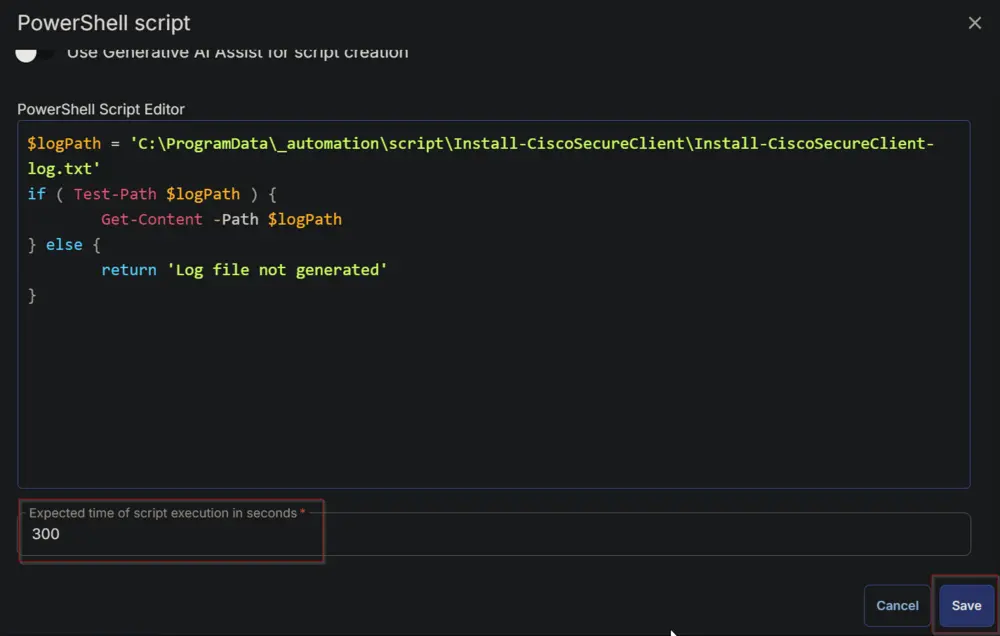
Mark the Continue on Failure checkbox.
Row 7 Function: Script Log
Insert a new row by clicking the Add Row button.
Select Script Log function.
Paste this line in the Script Log Message box and click the Save button.
Log Content:
%Output%
Row 8 Function: PowerShell Script
Insert a new row by clicking the Add Row button.
Select PowerShell Script function.
Paste in the following PowerShell script, set the expected time of script execution to 300 seconds, and click the Save button.
$errorLogPath = 'C:\ProgramData\_automation\script\Install-CiscoSecureClient\Install-CiscoSecureClient-Error.txt'
if ( Test-Path $errorlogPath ) {
    Get-Content -Path $errorLogPath
} else {
    return 'Errors Logs not generated.'
}
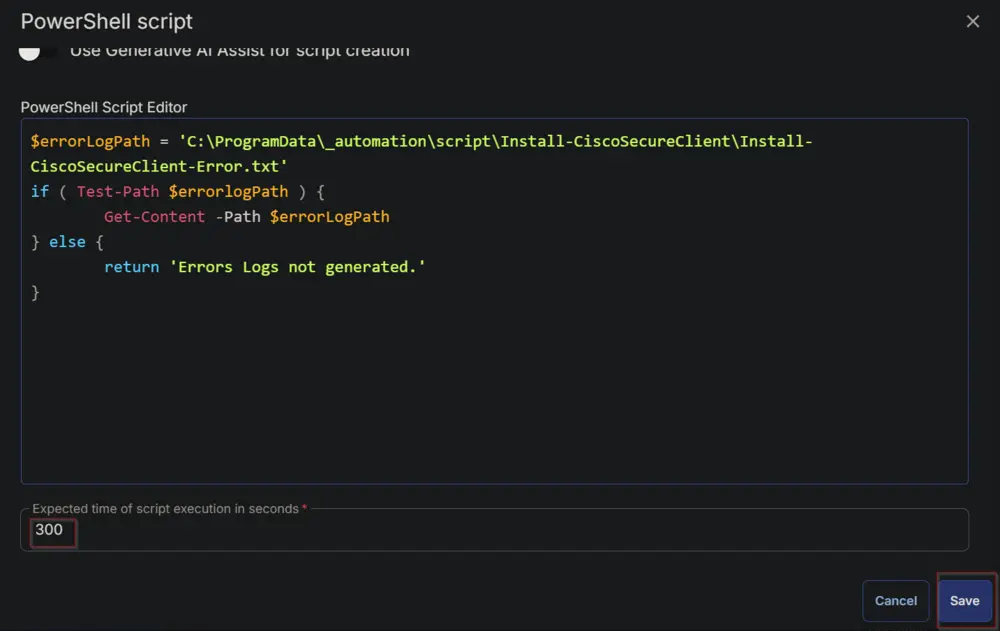
Mark the Continue on Failure checkbox.
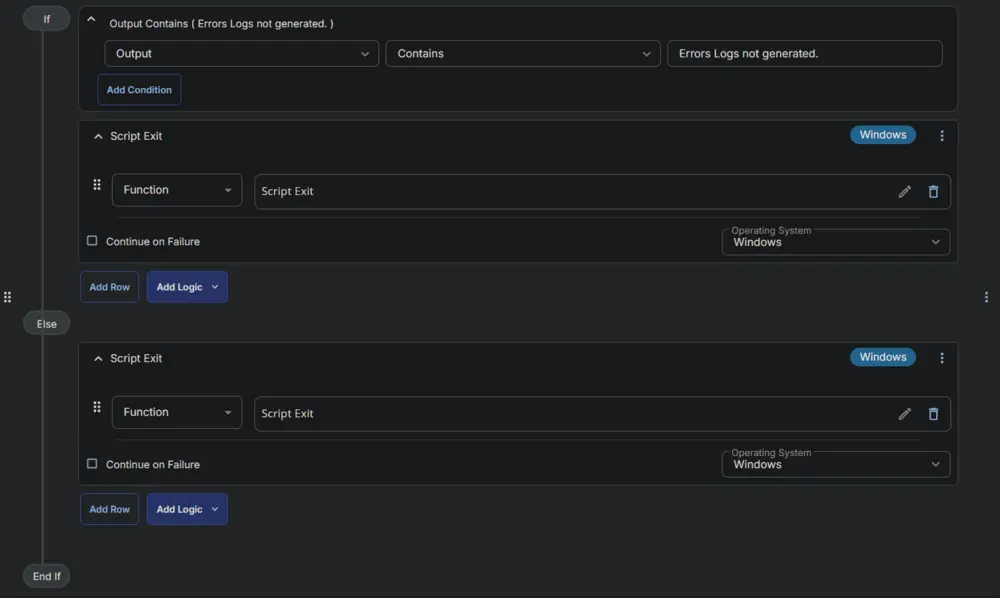
Row 9 Logic: If/Then/Else
Insert a new row by selecting the If/Then/Else option from the Add Logic dropdown button.


Row 9a Condition: Output Contains
Type Errors Logs not generated. in the Input Value or Variable field.

Row 9b Function: Script Exit
Insert a new row by clicking the Add Row button inside the If/Then/Else logic after the Output Contains condition.

Select Script Exit function.
Click the Save button for the Error Message prompt box without adding anything to the text field.

Row 9c Function: Script Exit
Insert a new row by clicking the Add Row button inside the If/Then/Else logic in the Else section.

Select Script Exit function.
Paste this line in the Error Message box and click the Save button.
Error Log Content:
%Output%

Click the Save button at the top-right corner of the screen to save the script.
Store the proper parameter at the company-level custom field Cisco Secure Client Parameter before scheduling or running the script.
Completed Script
Module Definitions
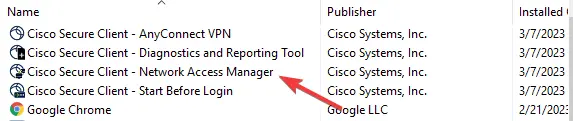
Core-VPN
- Core-VPN must be installed with any additional module.
- All modules require that Core-VPN be installed.
- When only installing Core-VPN, you can expect to see the following.


Start Before Login
- SBL stands for Start Before Login; it adds no direct user GUI, however, it does add an entry into programs and features.
- It enables the execution of the AnyConnect VPN prior to a user being logged in.

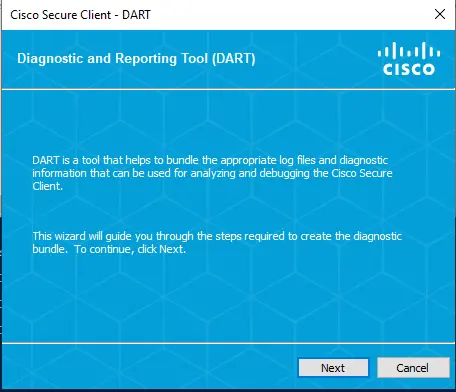
Diagnostic and Reporting Tool
- DART stands for Diagnostics and Reporting Tool.
- When installing this, you can expect to see the following items.


Network Access Manager
- NAM stands for Network Access Manager.
- When installing this module, you can expect to see the following items.

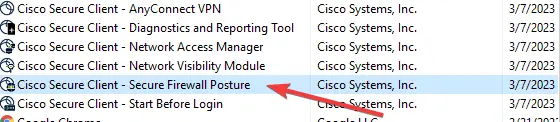
Network Visibility Module
- NVM stands for Network Visibility Manager.
- Network Visibility Manager does not include a GUI but does the following:
- Network Visibility Manager helps you see user and endpoint behavior both on and off premises. It collects standard flows from endpoints (laptops, for example) along with context like user, application, device, location, and destination information.

VPN Posture - HostScan Module
- Posture provides the Cisco AnyConnect Secure Mobility Client with the ability to assess an endpoint's compliance for things like antivirus, antispyware, and firewall software installed on the host.
- It does not provide a User GUI.
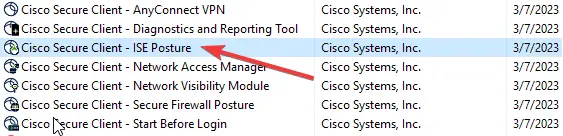
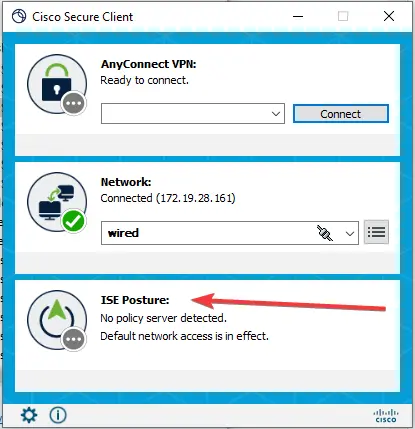
ISE Posture
- ISE Posture provides the Cisco AnyConnect Secure Mobility Client with the ability to assess an endpoint's compliance for things like antivirus, antispyware, and firewall software installed on the host, with a user GUI interface.
- When installing this module, you can expect to see the following:
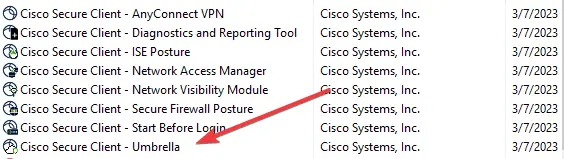
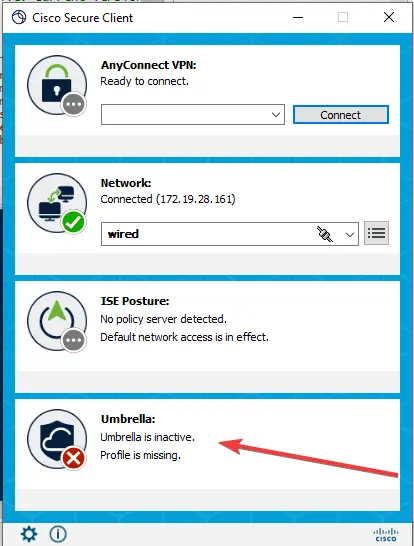
Umbrella
- Umbrella installs the Cisco Umbrella module.
- When installing this module, you can expect to see the following:
Uninstalling
- When uninstalling this package, you can simply uninstall the Core-VPN module, and it will remove all embedded modules except for the DART module; that module will have to be removed separately.
FAQ
- Will this installation update older versions of Cisco AnyConnect?
- Yes, each requested component will be updated if run against a machine that has that component already installed. Components that are not requested will not be updated.
Output
- Script log
Changelog
2025-04-10
- Initial version of the document