ProSync Client
Overview
The ProSync Client is a ConnectWise Automate plugin designed to connect to a centrally managed Automate instance via REST API calls. The plugin will download and synchronize content from the central instance to the installed instance. Developed by ProVal Tech, the plugin is written in C# and is a piece of the ProSync solution, along with the ProSync Server and the ProSync API.
Build With
.NET and Project Details
- Target Framework: .NET Framework 4.8 (
net48) - Language: C#
- Project Type: Class Library plugin
Packages used
- BouncyCastle.Cryptography: 2.6.2
- Costura.Fody: 6.0.0
- Fody: 6.9.3
- Google.Protobuf: 3.34.1
- K4os.Compression.LZ4: 1.3.8
- K4os.Compression.LZ4.Streams: 1.3.8
- K4os.Hash.xxHash: 1.0.8
- Microsoft.Bcl.AsyncInterfaces: 10.0.5
- Microsoft.Extensions.DependencyInjection.Abstractions: 10.0.5
- Microsoft.Extensions.Logging.Abstractions: 10.0.5
- Microsoft.NETCore.Platforms: 7.0.4
- MySql.Data: 9.6.0
- NETStandard.Library: 2.0.3
- Newtonsoft.Json: 13.0.4
- SSH.NET: 2025.1.0
- System.Buffers: 4.6.1
- System.Collections: 4.3.0
- System.Collections.Concurrent: 4.3.0
- System.Configuration.ConfigurationManager: 10.0.5
- System.Diagnostics.Debug: 4.3.0
- System.Diagnostics.DiagnosticSource: 10.0.5
- System.Diagnostics.Tools: 4.3.0
- System.Diagnostics.Tracing: 4.3.0
- System.Formats.Asn1: 10.0.5
- System.Globalization: 4.3.0
- System.IO: 4.3.0
- System.IO.Compression: 4.3.0
- System.IO.Pipelines: 10.0.5
- System.Linq: 4.3.0
- System.Linq.Expressions: 4.3.0
- System.Memory: 4.6.3
- System.Net.Http: 4.3.4
- System.Net.Primitives: 4.3.1
- System.Numerics.Vectors: 4.6.1
- System.ObjectModel: 4.3.0
- System.Reflection: 4.3.0
- System.Reflection.Extensions: 4.3.0
- System.Reflection.Primitives: 4.3.0
- System.Resources.ResourceManager: 4.3.0
- System.Runtime: 4.3.1
- System.Runtime.CompilerServices.Unsafe: 6.1.2
- System.Runtime.Extensions: 4.3.1
- System.Runtime.InteropServices: 4.3.0
- System.Runtime.InteropServices.RuntimeInformation: 4.3.0
- System.Runtime.Numerics: 4.3.0
- System.Security.Cryptography.Algorithms: 4.3.1
- System.Security.Cryptography.Encoding: 4.3.0
- System.Security.Cryptography.Primitives: 4.3.0
- System.Security.Cryptography.X509Certificates: 4.3.2
- System.Text.Encoding: 4.3.0
- System.Text.Encoding.Extensions: 4.3.0
- System.Text.RegularExpressions: 4.3.1
- System.Threading: 4.3.0
- System.Threading.Tasks: 4.3.0
- System.Threading.Tasks.Extensions: 4.6.3
- System.Threading.Timer: 4.3.0
- System.ValueTuple: 4.6.2
- System.Xml.ReaderWriter: 4.3.1
- System.Xml.XDocument: 4.3.0
- ZstdSharp.Port: 0.8.7
Installation
To install the ProSync Client plugin, first download the latest DLL binary from this Link. Once you have the ProSyncClient.dll downloaded, use the following steps to perform the initial setup of the plugin:
- Open the ConnectWise Automate Control Center and navigate to System > Solutions > Plugin Manager.
- In the top left corner, click Advanced > Manage Plugins > Add Plugin.
- In the File Dialog, select the downloaded
ProSyncClient.dlland click OK. - When prompted to restart the DB Agent, click Yes.
- After the DB Agent completes the restart, close and reopen the Automate Control Center.
- Open the ProSync Client menu by navigating to Tools > ProSync Client.
Usage
The ProSync Client is currently separated into two sections, Content and API Connection. If you have just installed the plugin, then you will want to start by entering the API Connection information.
API Connection
The API Connection section is where you will enter the Client Name and Secret for the ProSync Client to connect to the ProSync API. Refer to the documentation for the ProSync Server on creating API Clients. No other functions will be available in the ProSync Client without valid API connection information.

- Client Name - Enter the API client name here.
- Client Secret - Enter the API client secret here.
- Once the Name and Secret are filled in, click Apply to save the credentials into the ProSync Client API table for future authentication.
- Client Name Label - Shows the currently configured client name in the API table.
- Test Connection Button - Uses the currently configured API credentials to test the connection to the
ProSync API. Presents a pop-up window with the results.
Content
The Content section of the ProSync Client is where content can be synced into or removed from the client Automate instance.
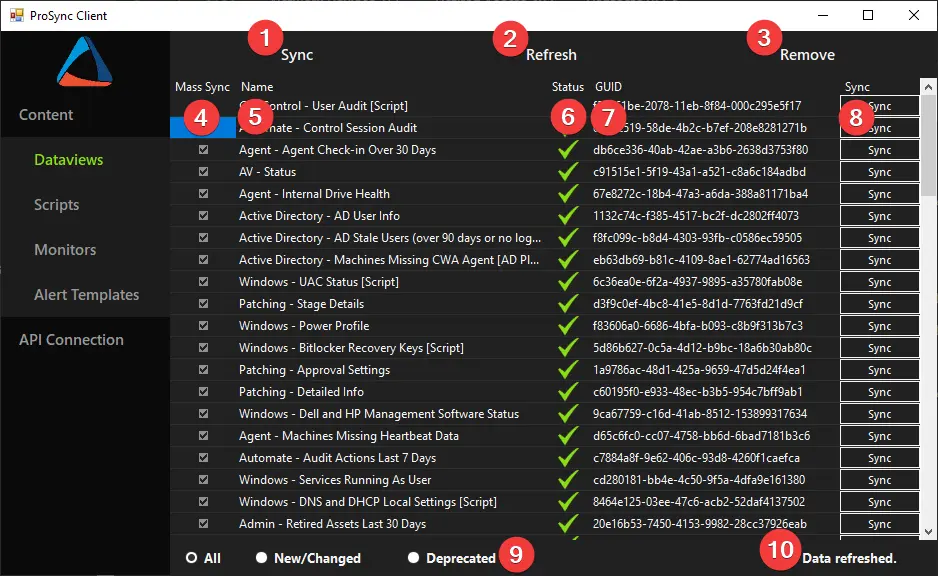
- Mass Sync Button - Syncs all content of the selected type. Items with the Mass Sync checkbox unchecked are excluded. Items with Global or Ticket tags are excluded.
- Refresh Button - Refreshes the data in the content table.
- Remove Button - Removes ALL content of the selected type from the Automate instance.
- Mass Sync Checkbox - If checked, the item will be included in the synchronization process when clicking the Mass Sync Button.
- Name - The name of the content piece.
- Status Icon - The current synchronization status of the content piece.
 Up To Date - The content is the latest version available from the API.
 Update Available - The content has an updated version from the API.
 Deprecated - The content has been removed from the API.
 Not Installed - The content has not been synchronized from the API. All content will show as Not Installed upon first installation of the plugin, regardless of previous manual imports. Running a Mass Sync will update the icons after completing.
- GUID - The GUID of the content piece. This will be a consistent GUID between the client and the server.
- Sync Button - Used to sync a single piece of content. This ignores the Mass Sync status and will remove content from the client Automate server if it is deprecated.
- Filter Radio Buttons - Filters the list based on status of the content. Note that this does not filter the targets for the Mass Sync Button or the Remove Button. These buttons will still target all available content of the selected type.
- Status Label - Will show the last action taken and a loading spinner while an action is in progress.
Changelog
2026-04-14
- Updated the tool to .NET 4.8
- Updated all NuGet packages
- Removed the dependency on the deprecated BouncyCastle.Crypto package
- Improved logging and added more detailed information in the log files
2025-05-06
- Initial version of the document