Create a PowerShell-based Role
Summary
This document outlines the process of creating roles in ConnectWise Automate using PowerShell.
Process
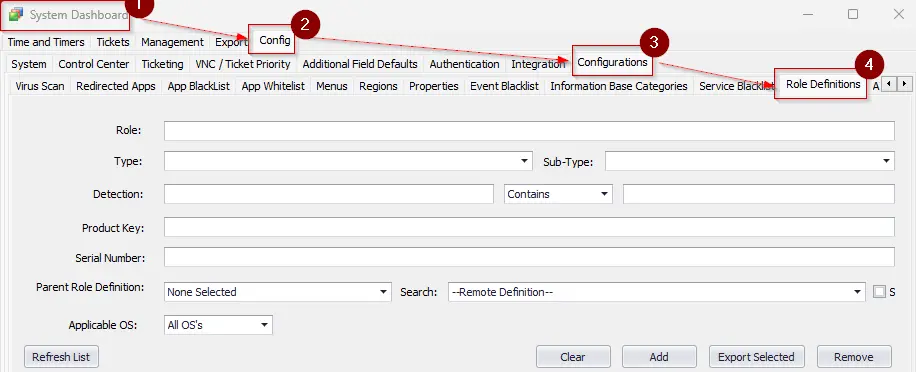
- Navigate to
System>Configuration>Dashboard

- Navigate to
Config>Configurations>Role DefinitionsinSystem Dashboard.
-
Create a simple PowerShell command that you want to use.
Example
(Get-NetAdapterBinding -Name '*' -ComponentID 'ms_tcpip6').EnabledPossible Output
0 | 1 -
Fill the appropriate information in role definition.
Role: Name of the Role Type: Type of the Role. Sub-Type: Sub-Type of the Role if any. Applicable OS: Operating System where the role definition applies.
Example
Role: IPv6 Enabled Type: PowerShell Sub-Type: Role Applicable OS: Windows

-
Convert the PowerShell string into the Detection string to be used.
Format:
{%@C:\Windows\System32\WindowsPowerShell\v1.0\powershell.exe -ExecutionPolicy Bypass -Command "<Command>"@%}Example:
{%@C:\Windows\System32\WindowsPowerShell\v1.0\powershell.exe -ExecutionPolicy Bypass -Command "(Get-NetAdapterBinding -Name '*' -ComponentID 'ms_tcpip6').enabled"@%} -
Paste the command in the
Detectionfield. Set the appropriate operator and comparator.Example
Detection:
{%@C:\Windows\System32\WindowsPowerShell\v1.0\powershell.exe -ExecutionPolicy Bypass -Command "(Get-NetAdapterBinding -Name '*' -ComponentID 'ms_tcpip6').enabled"@%}Operator:EqualsComparator:1
-
Click the
Addbutton to create the role.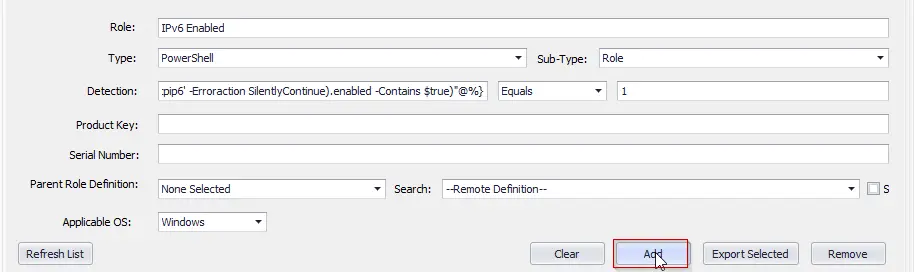
-
Reload the system cache.

-
The role will take two to three hours to be detected on the computers.
Changelog
2025-04-03
- Initial version of the document