SentinelOne Management Console Validation
Summary
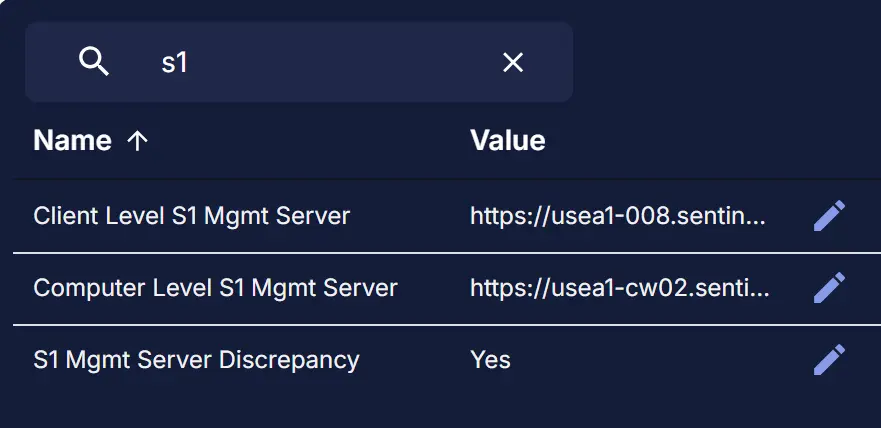
The task validates whether the SentinelOne Management Server detected on the computer is different from what is set for the Client in CW RMM. Information gathered by this task is stored in the following custom fields:
Sample Run
Dependencies
- Custom Field - Endpoint - S1 Mgmt Server Discrepancy
- Custom Field - Endpoint - Computer Level S1 Mgmt Server
- Custom Field - Endpoint - Client Level S1 Mgmt Server
- Custom Field - Site - SentinelOne Site Key
- Dynamic Group - SentinelOne Installed
Task Creation
Create a new Script Editor style script in the system to implement this Task.

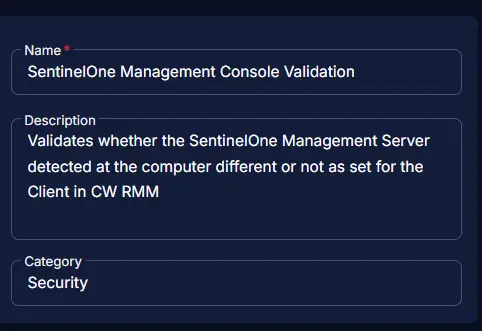
Name: SentinelOne Management Console Validation
Description: The task validates whether the SentinelOne Management Server detected on the computer is different from what is set for the Client in CW RMM
Category: Security
Task
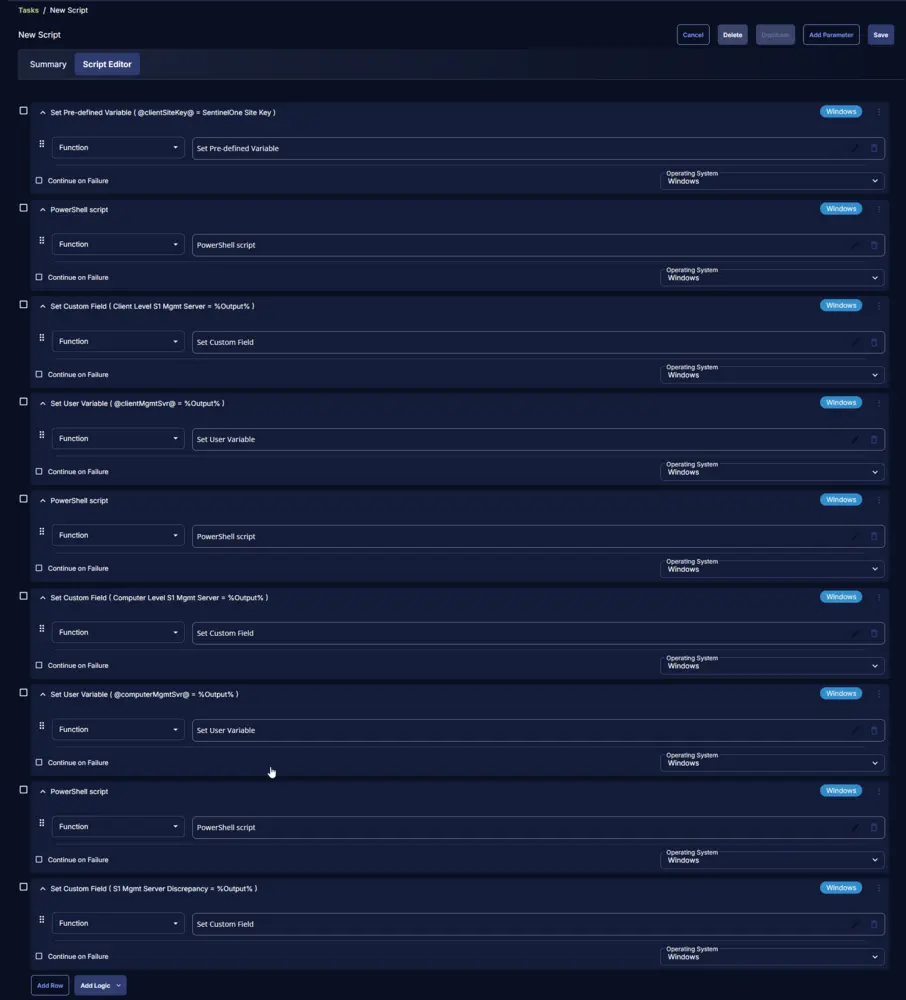
Navigate to the Script Editor Section and start by adding a row. You can do this by clicking the Add Row button at the bottom of the script page.

A blank function will appear.

Row 1 Function: Set Pre-defined Variable
Search and select the Set Pre-defined Variable function.

The following function will pop up on the screen:

- Select the
Custom Fieldradio button. - Set
clientSiteKeyin theVariable Namefield. - Search and select the Client-Level Custom Field
SentinelOne Site Keyfrom the Custom Field dropdown menu.- If the partner uses a different custom field to store the SentinelOne Site Key, then use that one instead.
- Click the
Savebutton.


Row 2 Function: PowerShell Script
Add a new row by clicking the Add Row button.

Search and select the PowerShell Script function.

The following function will pop up on the screen:

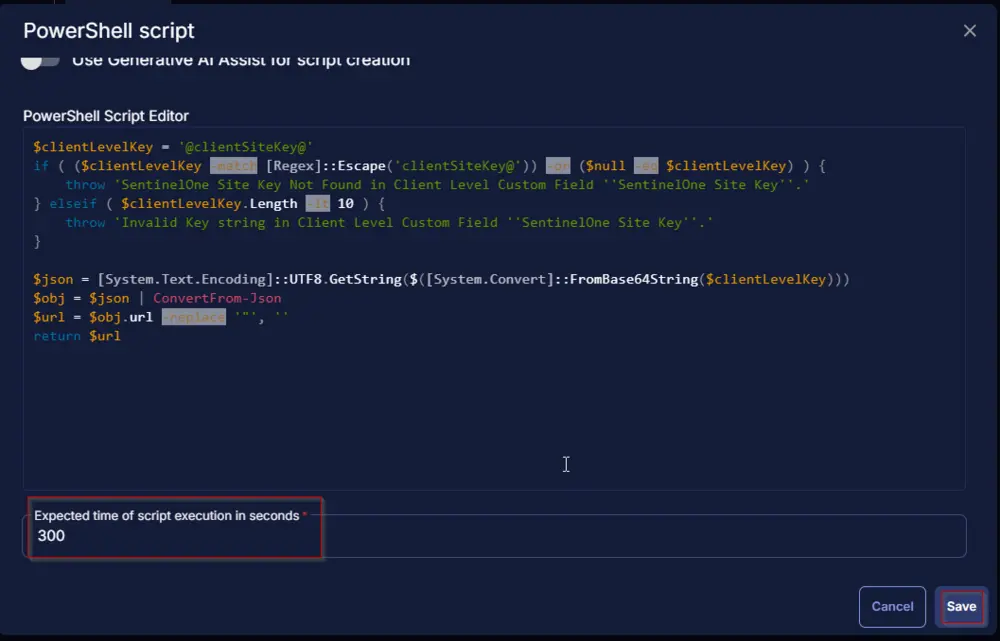
Paste in the following PowerShell script and set the Expected time of script execution in seconds to 300 seconds. Click the Save button.
$clientLevelKey = '@clientSiteKey@'
if ( ($clientLevelKey -match [Regex]::Escape('clientSiteKey@')) -or ($null -eq $clientLevelKey) ) {
    throw 'SentinelOne Site Key Not Found in Client Level Custom Field ''SentinelOne Site Key''.'
} elseif ( $clientLevelKey.Length -lt 10 ) {
    throw 'Invalid Key string in Client Level Custom Field ''SentinelOne Site Key''.'
}
$json = [System.Text.Encoding]::UTF8.GetString($([System.Convert]::FromBase64String($clientLevelKey)))
$obj = $json | ConvertFrom-Json
$url = $obj.url -replace '"', ''
return $url
Row 3 Function: Set Custom Field
Add a new row by clicking the Add Row button.
Search and select the Set Custom Field function.

The following function will pop up on the screen:

- Search and select the Computer-Level Custom Field
Client Level S1 Mgmt Serverfrom the Custom Field dropdown menu. - Set
%Output%in theValuefield. - Click the
Savebutton.


Row 4 Function: Set User Variable
Add a new row by clicking the Add Row button.
Search and select the Set User Variable function.

The following function will pop up on the screen:

- Set
ClientMgmtSvrin theVariable Namefield. - Set
%Output%in theValuefield. - Click the
Savebutton.


Row 5 Function: PowerShell Script
Add a new row by clicking the Add Row button.
Search and select the PowerShell Script function.
The following function will pop up on the screen:
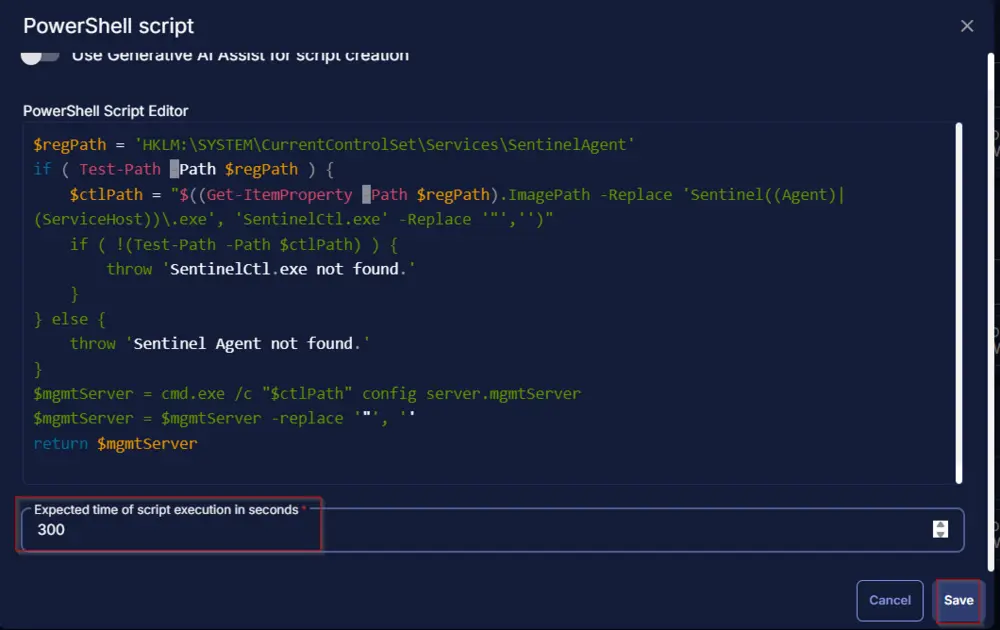
Paste in the following PowerShell script and set the Expected time of script execution in seconds to 300 seconds. Click the Save button.
$regPath = 'HKLM:\SYSTEM\CurrentControlSet\Services\SentinelAgent'
if ( Test-Path -Path $regPath ) {
    $ctlPath = "$((Get-ItemProperty -Path $regPath).ImagePath -Replace 'Sentinel((Agent)|(ServiceHost))\.exe', 'SentinelCtl.exe' -Replace '"','')"
    if ( !(Test-Path -Path $ctlPath) ) {
        throw 'SentinelCtl.exe not found.'
    }
} else {
    throw 'Sentinel Agent not found.'
}
$mgmtServer = cmd.exe /c "$ctlPath" config server.mgmtServer
$mgmtServer = $mgmtServer -replace '"', ''
return $mgmtServer
Row 6 Function: Set Custom Field
Add a new row by clicking the Add Row button.
Search and select the Set Custom Field function.
The following function will pop up on the screen:
- Search and select the Computer-Level Custom Field
Computer Level S1 Mgmt Serverfrom the Custom Field dropdown menu. - Set
%Output%in theValuefield. - Click the
Savebutton.


Row 7 Function: Set User Variable
Add a new row by clicking the Add Row button.
Search and select the Set User Variable function.
The following function will pop up on the screen:
- Set
ComputerMgmtSvrin theVariable Namefield. - Set
%Output%in theValuefield. - Click the
Savebutton.


Row 8 Function: PowerShell Script
Add a new row by clicking the Add Row button.
Search and select the PowerShell Script function.
The following function will pop up on the screen:
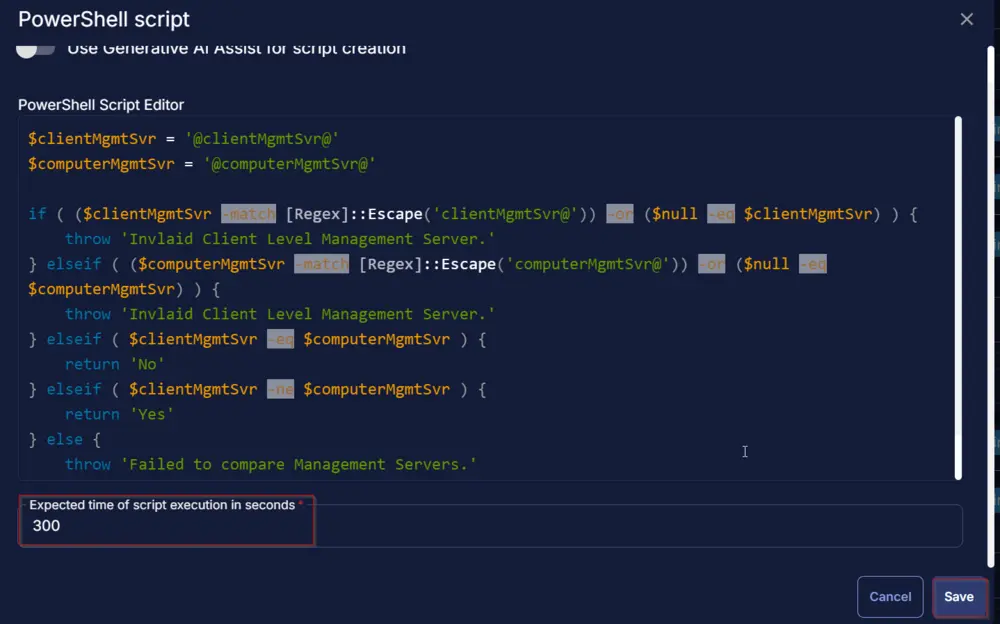
Paste in the following PowerShell script and set the Expected time of script execution in seconds to 300 seconds. Click the Save button.
$clientMgmtSvr = '@clientMgmtSvr@'
$computerMgmtSvr = '@computerMgmtSvr@'
if ( ($clientMgmtSvr -match [Regex]::Escape('clientMgmtSvr@')) -or ($null -eq $clientMgmtSvr) ) {
    throw 'Invlaid Client Level Management Server.'
} elseif ( ($computerMgmtSvr -match [Regex]::Escape('computerMgmtSvr@')) -or ($null -eq $computerMgmtSvr) ) {
    throw 'Invlaid Client Level Management Server.'
} elseif ( $clientMgmtSvr -eq $computerMgmtSvr ) {
    return 'No'
} elseif ( $clientMgmtSvr -ne $computerMgmtSvr ) {
    return 'Yes'
} else {
    throw 'Failed to compare Management Servers.'
}
Row 9 Function: Set Custom Field
Add a new row by clicking the Add Row button.
Search and select the Set Custom Field function.
The following function will pop up on the screen:
- Search and select the Computer-Level Custom Field
S1 Mgmt Server Discrepancyfrom the Custom Field dropdown menu. - Set
%Output%in theValuefield. - Click the
Savebutton.


Click the Save button at the top-right corner of the screen to save the script.

Completed Task
Implementation
It is suggested to run the Task once per month against the computers with the Sentinel Agent installed.
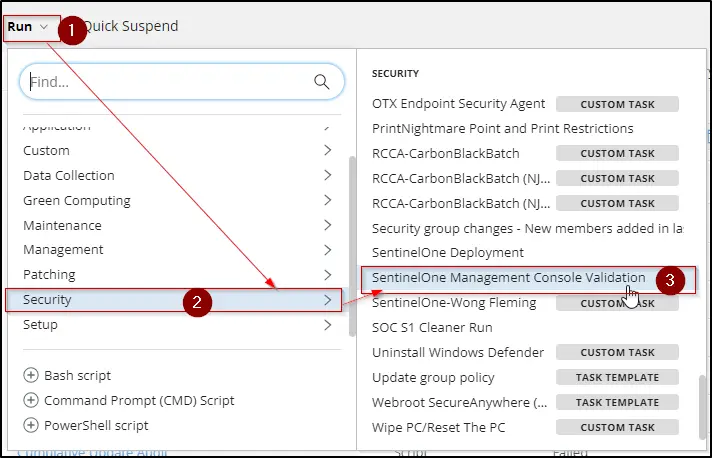
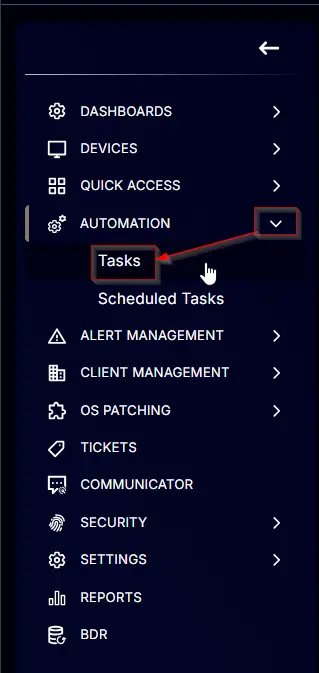
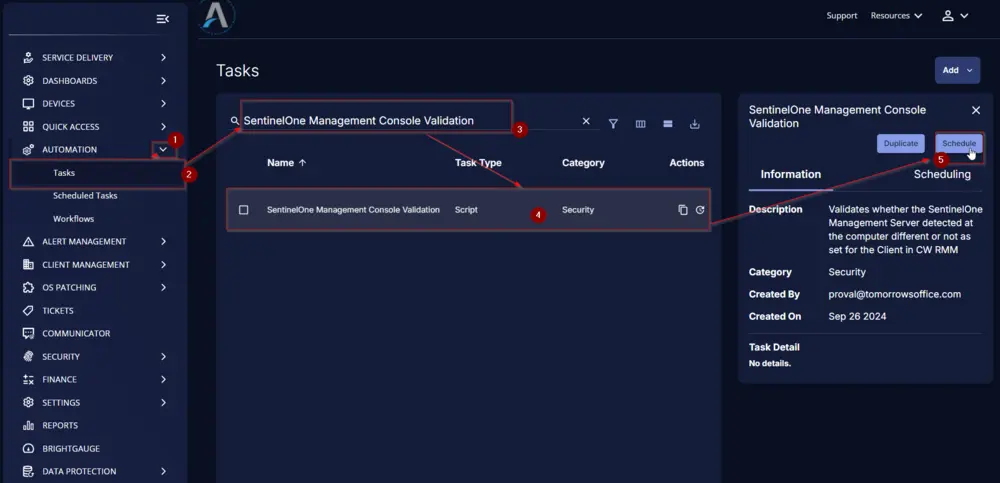
- Go to
Automation>Tasks. - Search for
SentinelOne Management Console Validation Task. - Select the concerned task.
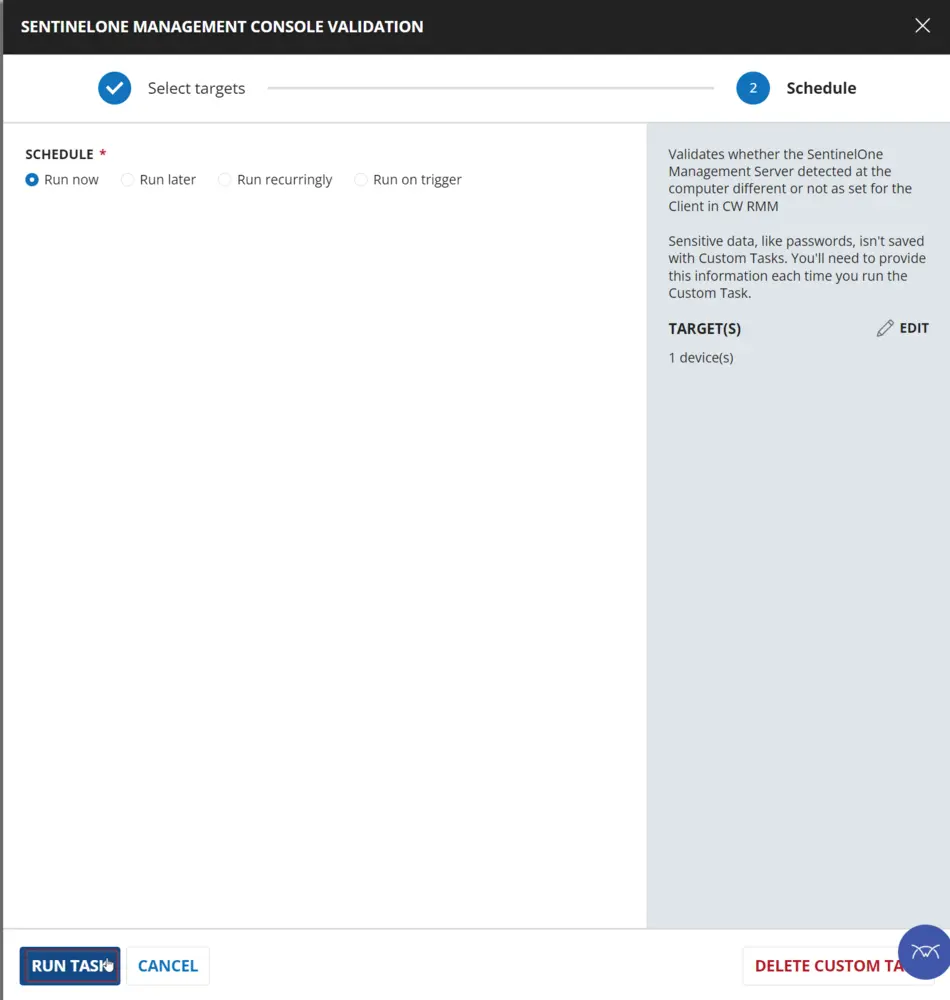
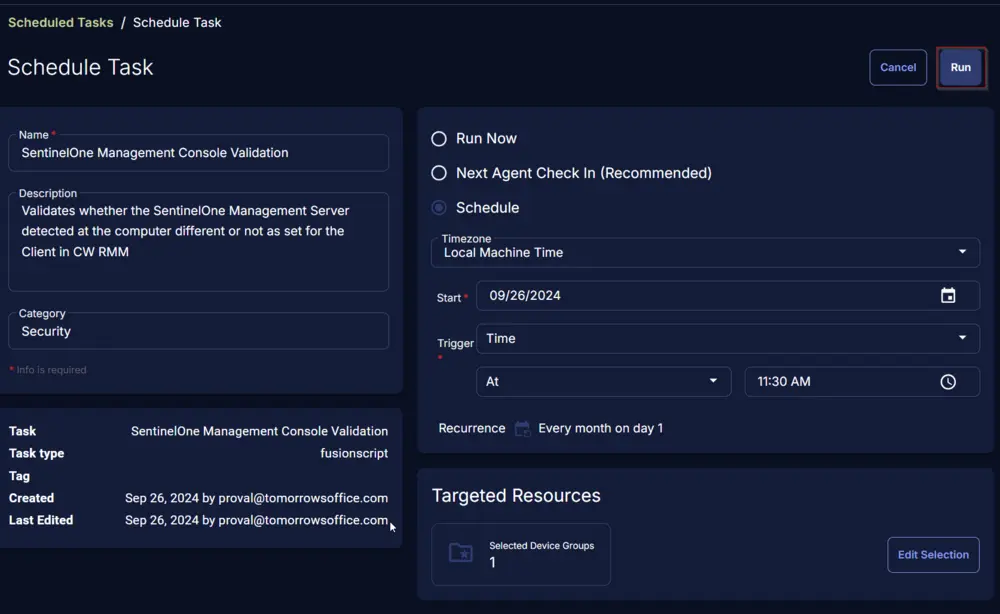
- Click on the
Schedulebutton to schedule the task/script.
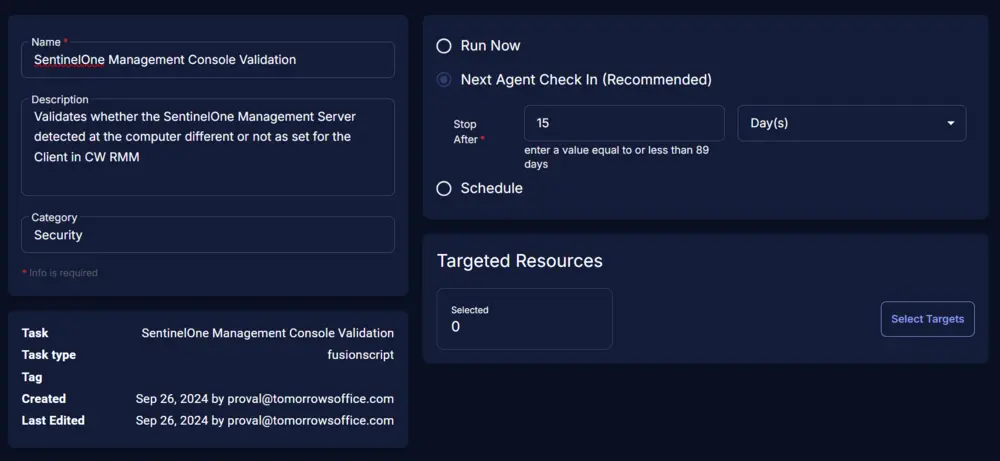
This screen will appear.
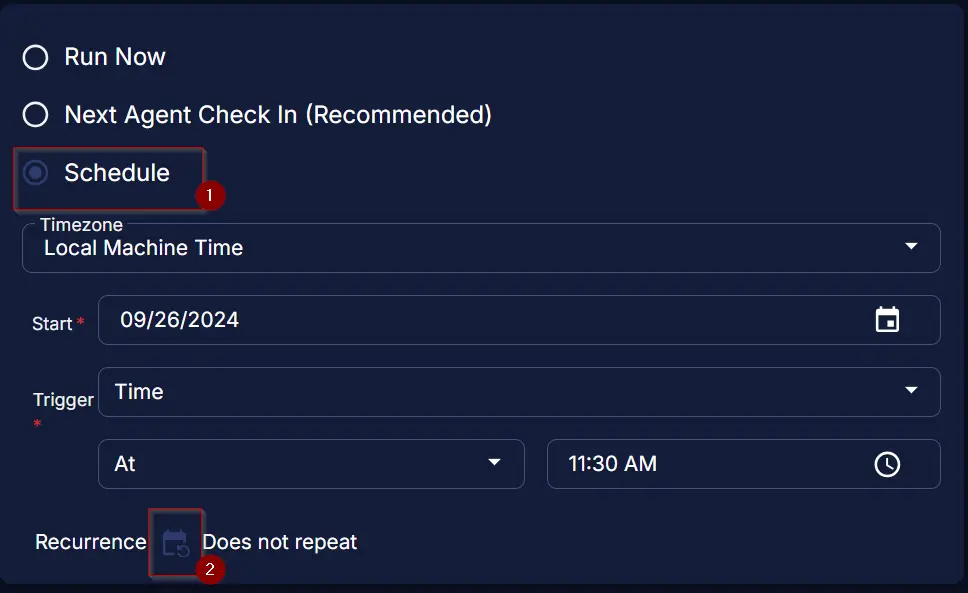
Select the Schedule button and click the calendar button present in front of the Recurrence option.
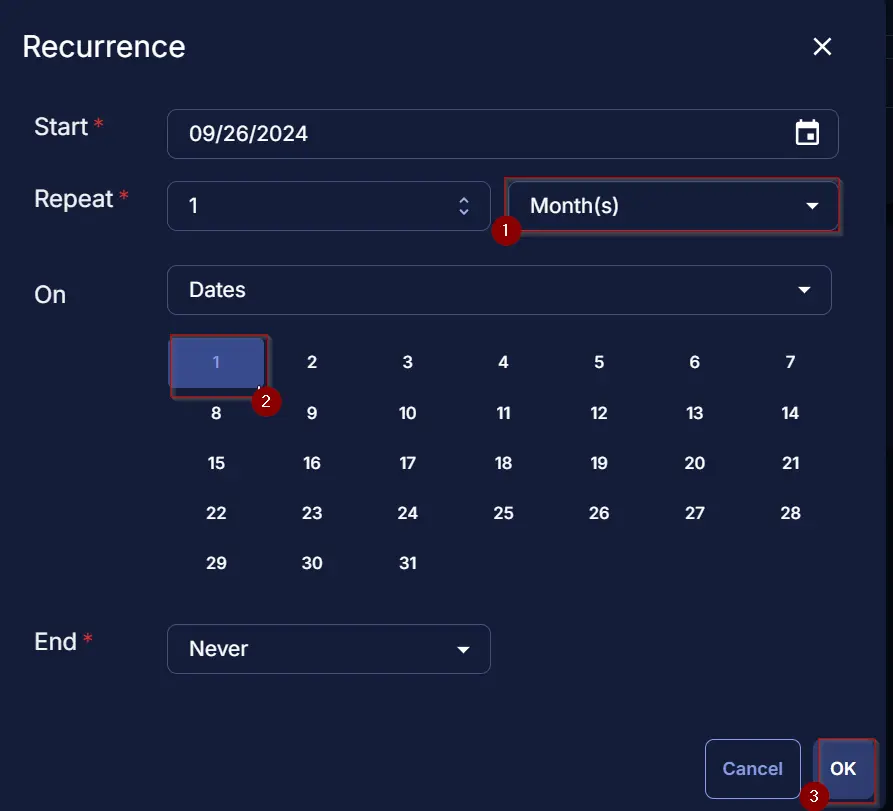
Select the Month(s) for the Repeat, 1 for Dates, and click the OK button to save the schedule.
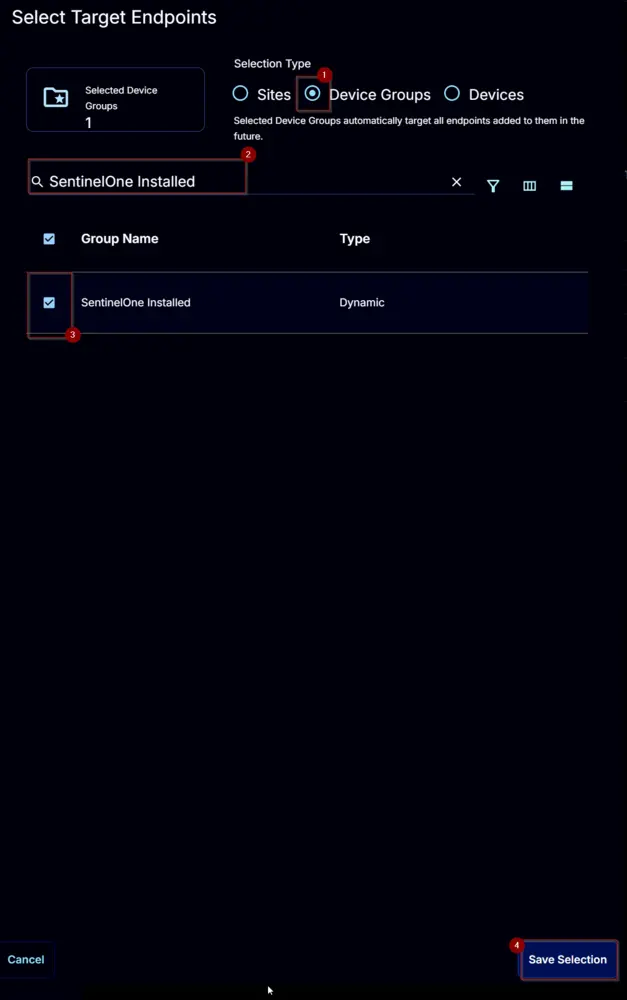
Click the Select Targets button to select the concerned target.

Search and select the SentinelOne Installed Device Group for the target.
- If the partner uses a different group for the computers with the
Sentinel Agentapplication installed, then use that one.
Click the Run button to initiate the schedule.
Output
- Custom Fields
Changelog
2025-04-10
- Initial version of the document